Hawaii’s largest island, nicknamed the “Big Island,” is known for its volcanoes, beaches, and diverse landscapes.
Three to four days is enough time to do world-class stargazing, snorkel with manta rays, and visit one of the rarest types of beaches in the world.
I did an epic trip to the Big Island, and here, I share great things to do and tips to optimize your itinerary. This post covers:
- ⭐️ Top things to do on the Big Island
- 🗓️ 3 to 4-day optimized itinerary
- 📍 Big Island map with key places
- 🚙 How to get around
- ✏️ Big Island trip planner
Lists By Lukiih is readers-supported. When you buy with my affiliate link, I may earn a small commission. Thanks!
The Big Island at a Glance
Before getting into the itinerary, here’s some general information on the Big Island to help you plan your trip.
🌋 What Is the Big Island Known For?
The Big Island, officially called “Hawaii Island,” is the biggest and the third most visited Hawaiian island, behind O’ahu and Maui. The Big Island is known for:
- Volcanoes – It has five volcanoes, three of which are active: Kīlauea, Mauna Loa, and Hualālai. The former is one of the most active volcanoes in the world.
- Beaches – Like many of the other Hawaiian islands, the Big Island has stunning beaches, as well as black sand and green sand beaches.
- Diverse landscapes – Due to its volcanic activity and large size, the Big Island has lush sceneries, deserts, mountains with snow, and other diverse geographic features that the other Hawaiian islands do not have.
📍 Where Is the Big Island Located?
The Island of Hawaii (aka the Big Island) is the southernmost Hawaiian Island. It’s located in the Pacific Ocean and is west of the United States.
🗓️ How Long To Spend on the Big Island?
You can spend three to seven days on the Big Island of Hawaii. You should spend at least three days to make the trip worth it.
- With just three days on the Big Island, you’ll only be able to visit a few of its top attractions and have to choose one to two areas of the island to visit.
- With four to five days on the Big Island, you’ll be able to cover many of the island’s big attractions and visit three to four sides of the island.
- With one week or more on the Big Island, you won’t run out of things to do since it has a diverse set of landscapes and activities.
I spent four days on the Big Island and felt that I could have stayed for at least one more day.
☀️ Best Time To Visit the Big Island
Although the Big Island has year-round warm, tropical weather, the best time to visit it is during the dry season and when there are fewer crowds.
- Dry season (April to October) – During this time, you’ll experience more sunshine and less rain. April to mid-June and September to November are ideal times to visit because it will be less crowded.
- Wet season (November to March) – During this time, the Big Island sees more rain. The rain is often localized and won’t significantly impact travel plans.
I visited in October and thought it was great with fewer visitors. The ocean water was warm enough to snorkel in, but it would get a tad chilly if I didn’t move around.
💰 Is the Big Island Expensive To Visit?
Hawaii is the most expensive state in the United States to travel to, and the Big Island is the fourth most expensive Hawaiian island out of the eight.
- Mid-range budget travelers can expect to spend about $200 a day on the Big Island.
- Budget travelers can spend about $110 a day on the Big Island. Anything lower will require more inconvenience and a higher commitment to primarily doing free activities.
The Big Island has good credit card infrastructure, but some places require cash, so bring at least $40 in US dollars.
See my budget breakdown for my trip to the Big Island.
Getting Around the Big Island
Once you land in one of the Big Island’s international airports, Kona International Airport (KOA) on the west side or Hilo International Airport (ITO) on the east side, the primary way to get around the island is by driving a rental car.
Aside from driving, other ways to get around the Big Island include ridesharing, booking a taxi, and taking the limited public bus.
🚙 Option 1: Rental Car
The best way to get around the Big Island is by driving, as this will give you the most flexibility. A standard rental car costs about $30 a day, not including gas.
The Big Island is sprawling, so you should expect to drive 30 minutes to two hours traveling to different parts of the island. Luckily, a lot of the drives are scenic with ocean views.
You will need a 4×4 if you plan to summit Mauna Kea. Not all rental companies will allow you to drive up there, so make sure to double-check if Mauna Kea is covered.
🚌 Option 2: Public Bus
The Big Island has a limited bus system called the Hele-On Bus. This is the cheapest way to get around the island.
However, given how infrequently it runs and how long it takes between the stops, the bus is only viable if you have a lot of time to spare.
🚕 Option 3: Taxi or Uber
Taxis, Uber, and Lyft are available on the Big Island. These options are more expensive than a rental car unless you’re using them for a few one-off rides. Taxis are mainly available near airports and a few big attraction areas.
When I was on the Big Island, a one-way Uber ride from the west side of the island to the Kona airport was $21 per person, so the total cost was more than the price of a rental car for an entire day.
Big Island Itineraries
Below is a great way to spend three to four packed days on the Big Island, featuring the best and most unique things the island has to offer.
You’ll notice that the Big Island requires a lot of driving if you want to visit the top attractions. These itineraries minimize transportation time by efficiently sequencing attractions while balancing downtime and activities.
To help you plan efficiently, I’ve included suggested times for each activity based on my firsthand experience.
3-Day Itinerary Map for the Big Island
This map has all the recommended places in the three-day Big Island travel itinerary below.
3-Day Itinerary for the Big Island
This three-day Big Island itinerary focuses on visiting the three most popular areas of the island.
| Day 1 – Kona & Manta Rays | ||
| 🥾 | Hike Captain Cook and snorkel at Kealakekua Bay | 9 am–2 pm |
| 🤿 | Snorkel at Two Step Beach | 2:30–4 pm |
| 🌕 | Snorkel with manta rays at night | 6–8:30 pm |
| Day 2 – Hawaii Volcanoes & Mauna Kea | ||
| 🐬 | Visit Ho’okena Beach for spinner dolphins | 8–9 am |
| 🚙 | Drive to the national park | 90 mins |
| 🌋 | Explore Hawaii Volcanoes National Park | 11:30 am–4 pm |
| 🚙 | Drive to Mauna Kea | 2 hours |
| 🌟 | Watch the sunset or stargaze at Mauna Kea | 6–8 pm |
| Day 3 – Green Sand Beach | ||
| 🤿 | Snorkel at Kukio Bay or Hapuna Beach | 9–10 am |
| 🚙 | Drive to the south side of the island | 2 hours |
| 🏝️ | Hike to Papakōlea Green Sand Beach | 1–4 pm |
| 🚙 | Drive to the next beach | 45 mins |
| 🐢 | Visit Punalu’u Black Sand Beach for sea turtles | 4:45–5:30 pm |
| 🍍 | Eat fresh food at Hilo Farmer’s Market | 11 am–12 pm |
With Less Time: How To Modify 3-Day Itinerary
If you have less than three full days on the Big Island or want more downtime, here’s how to modify the itinerary:
- First day – Instead of snorkeling at Two Step Beach, grab a local beer at Kona Brewery instead.
- Second day – Skip the national park to make time for more snorkeling or relaxing beach time. Mauna Kea requires more planning, but it’s best done at night, and it’s a unique experience, so keep that on the itinerary.
- Third day – Skip Kukio Bay and Hapuna Beach to focus on exploring the south side of the island. The Green Sand Beach is a unique activity that I wouldn’t miss.
4-Day Itinerary Map for the Big Island
This map has all the recommended places in the four-day Big Island travel itinerary below.
🗓️ 4-Day Itinerary for the Big Island
This four-day Big Island itinerary focuses on visiting the three most popular areas of the island as well as making a trip to the east side.
The Big Island trip planner below has this itinerary prefilled.
| Day 1 – Kona & Manta Rays | ||
| 🥾 | Hike Captain Cook and snorkel at Kealakekua Bay | 9 am–2 pm |
| 🤿 | Snorkel at Two Step Beach | 2:30–4 pm |
| 🌕 | Snorkel with manta rays at night | 6–8:30 pm |
| Day 2 – Hawaii Volcanoes National Park | ||
| 🐬 | Visit Ho’okena Beach for spinner dolphins | 8–9 am |
| 🚙 | Drive to the national park | 90 mins |
| 🌋 | Explore Hawaii Volcanoes National Park | 12 pm–5 pm |
| 🚙 | Drive to the black sand beach | 30 mins |
| 🐢 | Visit Punalu’u Black Sand Beach for sea turtles | 5:30–6 pm |
| 🚙 | Drive back to the west side of the island | 90 mins |
| Day 3 – Green Sand Beach | ||
| 🤿 | Snorkel at Kukio Bay or Hapuna Beach | 9–10 am |
| 🚙 | Drive to the south side of the island | 2 hours |
| 🏝️ | Hike to Papakōlea Green Sand Beach | 1–4 pm |
| 🚙 | Drive back to the west to Kona or head east to Hilo | 2 hours |
| Day 4 – Hilo & Mauna Kea | ||
| 🍍 | Eat fresh food at Hilo Farmer’s Market | 11 am–12 pm |
| 🌈 | Quick stop at Rainbow Falls | 12:15–12:40 pm |
| 🚙 | Drive to the state park | 30 mins |
| 🥾 | Walk through Akaka Falls State Park | 1:15–3 pm |
| 🚙 | Drive to Mauna Kea | 90 mins |
| 🌟 | Watch the sunset or stargaze at Mauna Kea | 6–8 pm |
10 Great Things To Do on the Big Island
Having spent four packed days on the Big Island, I share my recommendations and honest opinions on the top attractions and activities below, listed in rough order of priority.
1. Stargaze on Mauna Kea
🤔 Why: Mauna Kea is a world-renowned stargazing location due to its unpolluted, clear sky. The summit is also a popular place to catch the sunset (although the Hawaii bucket list sunset is in Maui).
Mauna Kea’s summit makes it the tallest mountain in the world when measured from the ocean’s base.
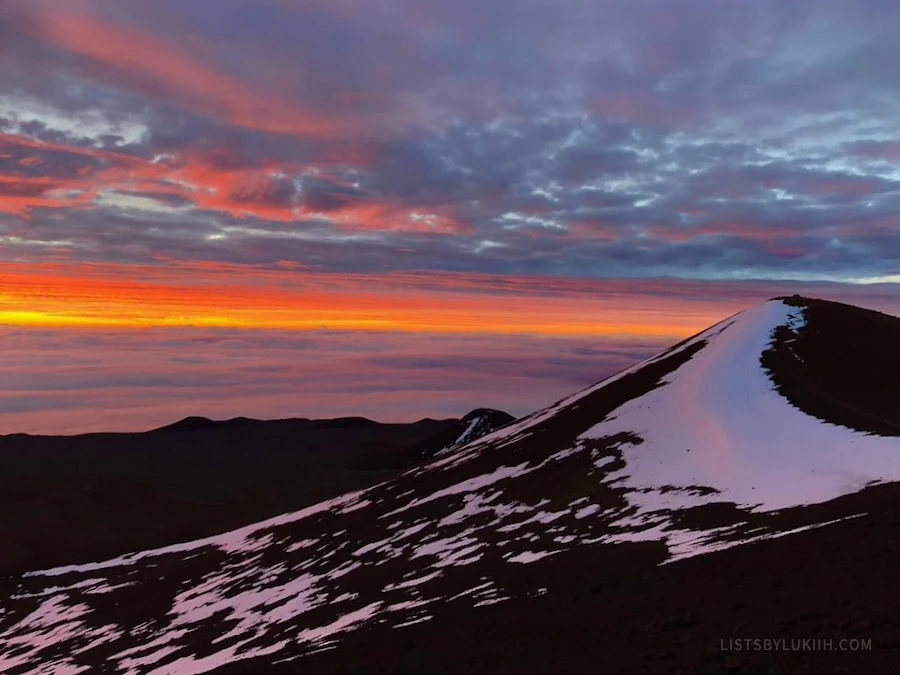
Several countries have established observatories at Mauna Kea as it’s considered one of the most advanced astronomical areas.
📍 Top Things To Do: There are two key locations on Mauna Kea:
- Mauna Kea’s Visitor Center is where you can do world-class stargazing.
- Mauna Kea Summit is where you can catch the sunset.
If you plan to go to the summit, drive there first, as it’s only open until 30 minutes past sunset. After sunset, go down to the visitor center to see more stars than you’ve ever seen in your life.
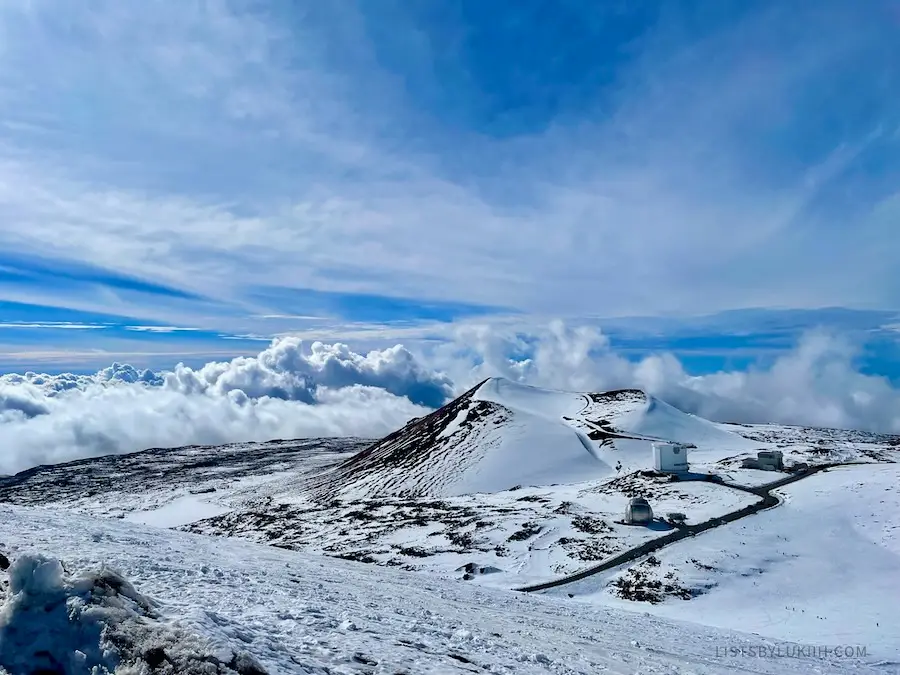
🚗 Getting There: Mauna Kea can be reached with a 4WD vehicle. You can drive on your own, but you’ll need some preparation as it gets very cold due to the high altitude and some rental companies don’t allow their rentals to go up the rough terrain.
This Mauna Kea guided tour provides gloves, jackets, transportation, and a photographer. Note that pickups are from Kona and Hilo and can be as early as 3 pm.
💰 Admission Fee: Free
⏰ Suggested Duration: 1 to 3 hours, not including transportation time
🍀 Lukiih’s Take: Mauna Kea is one of the most memorable things you can experience in Hawaii. You’ll never see as many stars in the sky at another location unless it’s extremely remote.
2. Snorkel With Manta Rays at Night
🤔 Why: Snorkeling with manta rays is one of the Big Island’s most memorable activities. Around sunset or during the nighttime, you’ll get to go into the ocean while holding onto a surfboard and watch manta rays swim all around you.
🚗 Getting There: Several tour operators in Kona offer the manta ray experience and as one of my local friends said, “virtually all of them are good.” This exceptional manta ray guided tour is described as “unreal” and “magnificent.”
Tour operators tend to offer a “sunset” manta ray tour that usually starts around 6 pm and a “night” tour that usually starts around 8:30 pm.
💰 Expected Cost: Budget $80 to $100 per person for this experience.
⏰ Duration: 2 to 3 hours
🍀 Lukiih’s Take: Snorkeling with manta rays on the Big Island is a trip highlight because you get to see so many rays at once and up close (they’re bigger than you imagine). Sometimes, they even do a flip right in front of you.
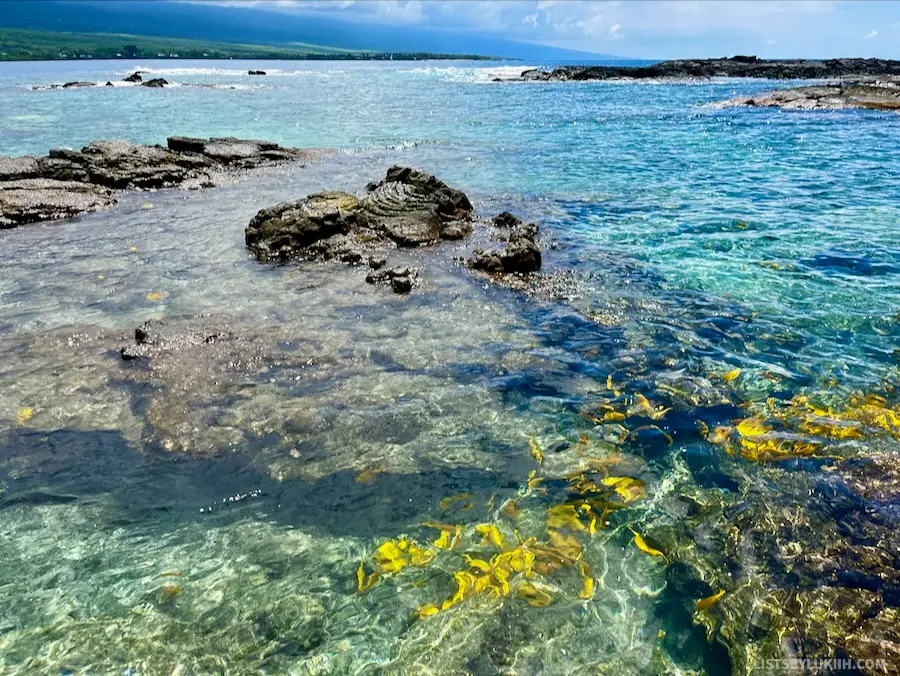
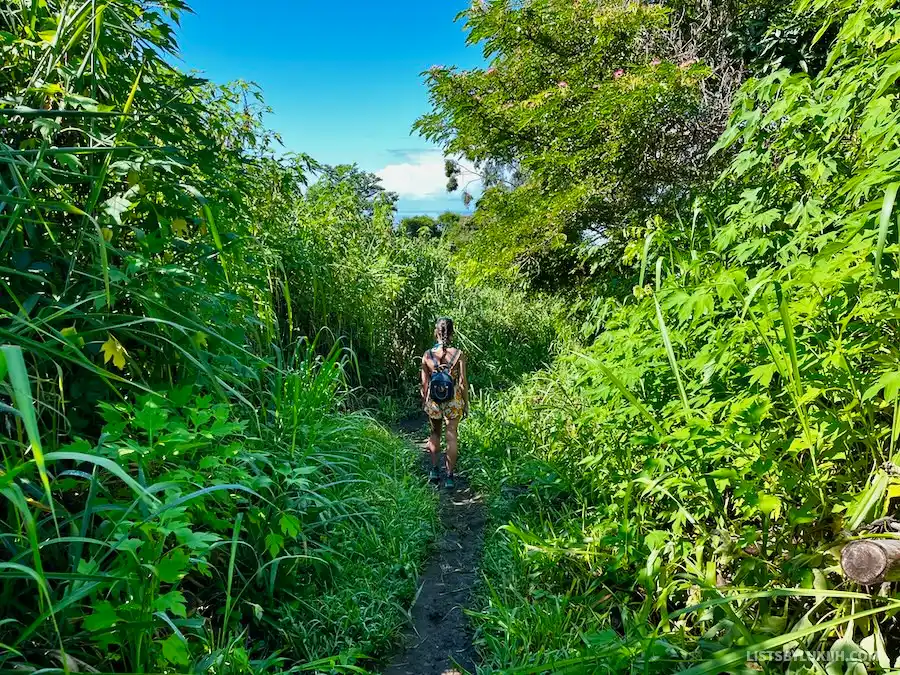
3. Hike Captain Cook and Snorkel in Kealakekua Bay
🤔 Why: Kealakekua Bay is one of Hawaii’s best snorkeling spots. It has tons of tropical fish, limited crowds in some areas, and clear water. One of the best ways to get to the right snorkeling spot is by hiking the Captain Cook Monument Trail.
🥾 Getting There: Kealakekua Bay is on the Kona coast, and you can get to it two different ways:
- By taking a boat ride from the south side of the bay. This increases your chance of seeing spinner dolphins since you’ll cross the bay, but you’ll need to pay a tour operator. Here’s a great Kealakekua snorkeling tour.
- By hiking the Captain Cook Monument trail on the north side. The hike can be challenging, but it’s free, and you can enter the water in a non-crowded area with many tropical fish.
See the full details in this Captain Cook and Kealakekua Bay guide.
💰 Expected Cost: Hiking is free. If you take a boat tour, expect to pay roughly $115 to $150 for a three to four-hour tour.
⏰ Suggested Duration: 3 to 4 hours
🍀 Lukiih’s Take: I found the hike to Captain Cook a bit challenging due to the lack of shade and tall grass, but the snorkeling at Kealakekua Bay was stunning and very well worth it.
4. Hike Hawaii Volcanoes National Park
🤔 Why: Hawaii Volcanoes National Park boasts Kīlauea Volcano and Mauna Loa Volcano, two of Hawaii’s most active volcanoes. The national park also has unique geological features that have cultural significance to the indigenous Hawaiian people.
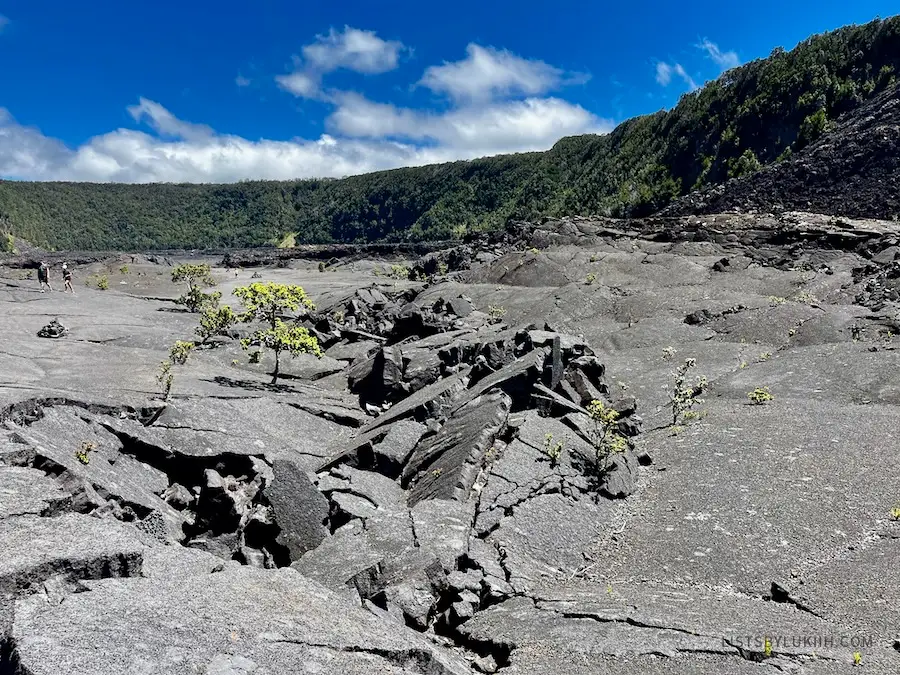
🌋 Top Things To Do: You can spend a whole day exploring Hawaii Volcanoes National Park hiking its many trails, looking at lava flows, exploring the lava tubes, and more. Here are some of the park’s main attractions:
- Kilauea Iki Trail and Crater Rim Trail – a 3.5-mile, moderate trail that takes you through a solidified lava lake and the crater’s rim.
- Keanakako’i Overlook – a viewpoint where visitors can see steam coming out of the volcano or, if they’re lucky, lava flowing out of it. The national park has several other overlooks and viewpoints.
- Thurston Lava Tube – a cave formed by lava flowing through a volcanic vent that you can walk through.

🚗 Getting There: Kīlausea Visitor Center of the Hawaii Volcanoes National Park is located on the southeastern side of the island, and it’s about a one to two-hour drive from the Kona side.
💰 Admission Fee: $30 per vehicle. The park’s pass is valid for seven days.
A National Park Service Pass will cover the entrance fee. I had the annual $80 park pass, so my car didn’t have to pay the fee.
⏰ Suggested Duration: You can spend a few hours or a few days exploring the park.
🍀 Lukiih’s Take: Hawaii Volcanoes National Park is a cool place to visit if you haven’t seen volcanic geology before, but I think being able to see lava flows is the highlight, which, unfortunately, you’re not guaranteed to see.
5. Hike Papakōlea Green Sand Beach
🤔 Why: Papakōlea Green Sand Beach is one of the rarest beaches in the world due to the sand’s natural coloring (it gets its color from a mineral called olivine). Only four beaches in the world have green sand.
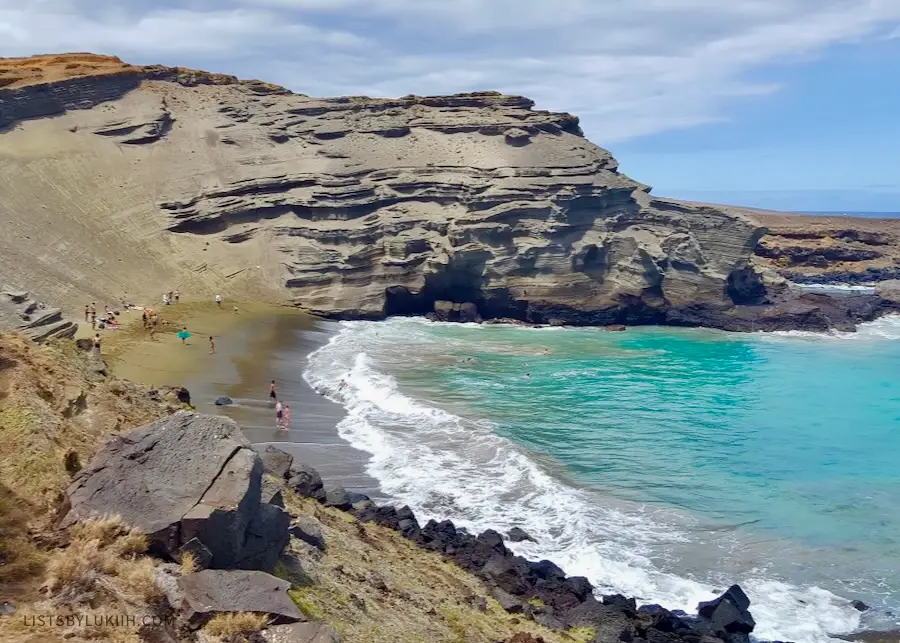
Be warned that the waves at Papakōlea can be huge, so you should be comfortable with swimming before getting in.
🚗 Getting There: There are two ways to get to Papakōlea Green Sand Beach, which is located on the south point of the Big Island, but only one way is recommended:
- Hiking – You can hike two-and-a-half miles to get to the beach. The terrain is mostly flat but non-shaded.
- Driving – You can also pay a local at the entrance to drive you to the beach in a 4×4. This is a common activity for tourists, but you should know that it’s illegal because off-road driving is eroding the landscape.
💰 Expected Cost: Hiking is free, but paying a local to drive will cost about $20 per person.
⏰ Suggested Duration: 3 hours total if you hike
🍀 Lukiih’s Take: Papakōlea Green Sand Beach is one of the most unique experiences you can have on the Big Island since there are only three other beaches in the world like it and they are in Guam, Ecuador, and Norway.
6. Visit Punalu’u Black Sand Beach for Sea Turtles
🤔 Why: Punalu’u Beach is one of the Big Island’s most famous black sand beaches and is known to be a great stop to see Hawaiian green sea turtles.
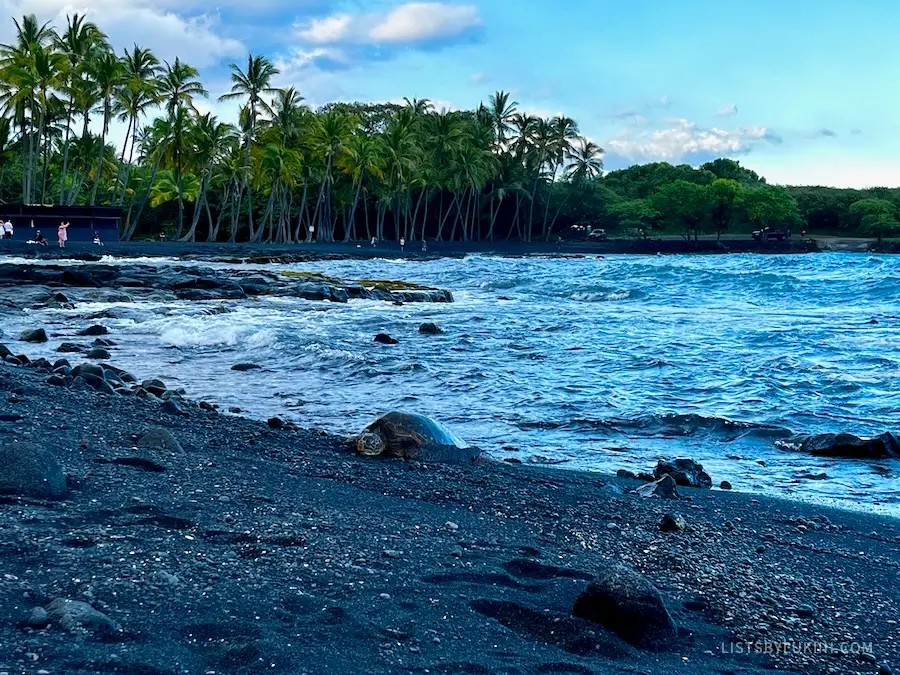
🚗 Getting There: Punalu’u Beach is located on the southern tip of the island, making it a great brief stop between the national park and the west side as you need to pass through that area regardless.
💰 Admission Fee: Free
⏰ Suggested Duration: 30 to 60 minutes
🍀 Lukiih’s Take: During my Punalu’u Beach stop after the national park, I was lucky enough to catch a sea turtle resting in the protected area of the beach. It’s also cool to know that the black sand is just tiny fragments of volcanic rock.
7. Snorkel on the Big Island’s Best Beaches
🤔 Why: The Big Island boasts pristine beaches with white sand and amazing snorkeling opportunities that are full of marine life and colorful fish.

🤿 Best Beaches: The following are some of the best places to snorkel in on the Big Island:
- Two Step Beach is a beautiful, top snorkeling site on the west side of the Big Island. Unlike Kealakekua Bay, which can be challenging to enter, Two Step Beach has easy access to the ocean.
Two Step is free and open to the public. However, street parking can be difficult and there’s a parking lot nearby that charges a $5 flat fee.
- Hapuna Beach is considered to be one of the United States’ most beautiful beaches, but it’s popular and crowded.
- Kukio Beach is on the west side of the island and is a hidden gem. You have the chance to see sea turtles here without the crowds.
Kukio Beach is surrounded by luxury resorts, but the beach and parking lot are public. To get to Kukio Beach, you have to ask the security located here to let you pass through the gated community.
- Ho’okena Beach is a popular grey-sand beach and a great spot to catch spinner dolphins. This is a great option to see dolphins in Hawaii without having to pay for a boat tour. The best time to catch them is in the early morning.
⏰ Suggested Duration: 1 to 2 hours
🍀 Lukiih’s Take: Hapuna Beach and Two Steps are both beautiful but extremely popular and crowded. If you don’t want to go through the hassle, Kukio Beach is a great, quiet beach that’s largely uncrowded.
8. Visit Hilo and Rainbow Falls
🤔 Why: Hilo on the east side of Hawaii is one of the wettest cities in the United States, but it’s the gateway to important attractions like the Hawaii Volcanoes National Park and Akaka Falls State Park.
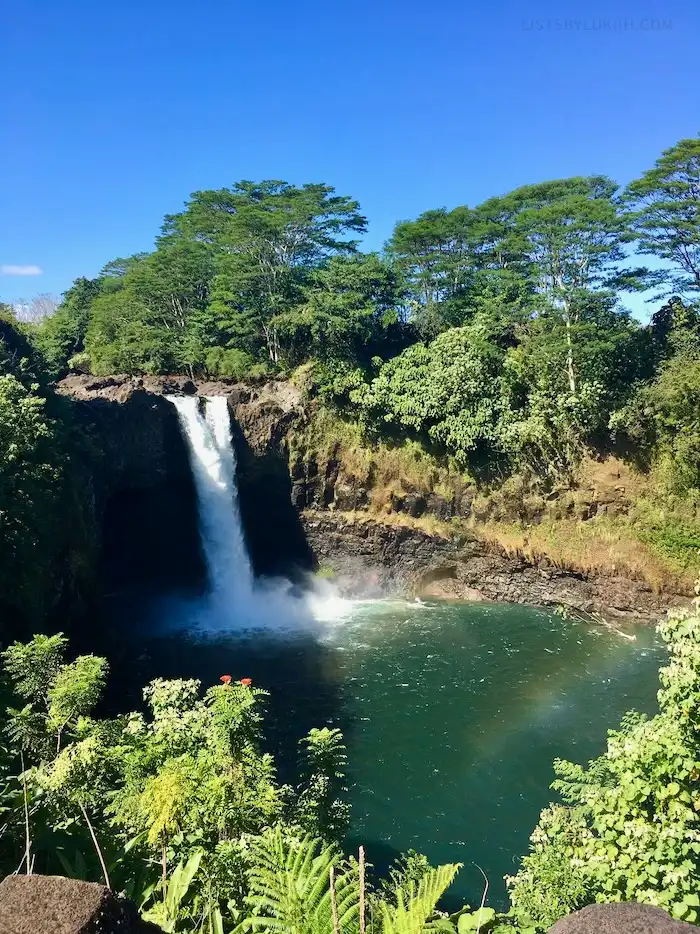
🍉 Great Things To Do: The following are some great things to do in Hilo:
- Hilo Farmer’s Market is a popular market selling fresh fruit and produce such as rambutan, lychee, mangosteen, and star fruit. It also sells souvenirs, shaved ice, and poke.
The fresh produce prices are higher than what you expect. Just remember that the produce tends to be fresher here due to Hawaii’s strong agriculture.
- A short drive away from the farmer’s market is Rainbow Falls, an easily accessible waterfall. On sunny days, you can catch a rainbow near the waterfall. The waterfall is open to the public, and it’s free.
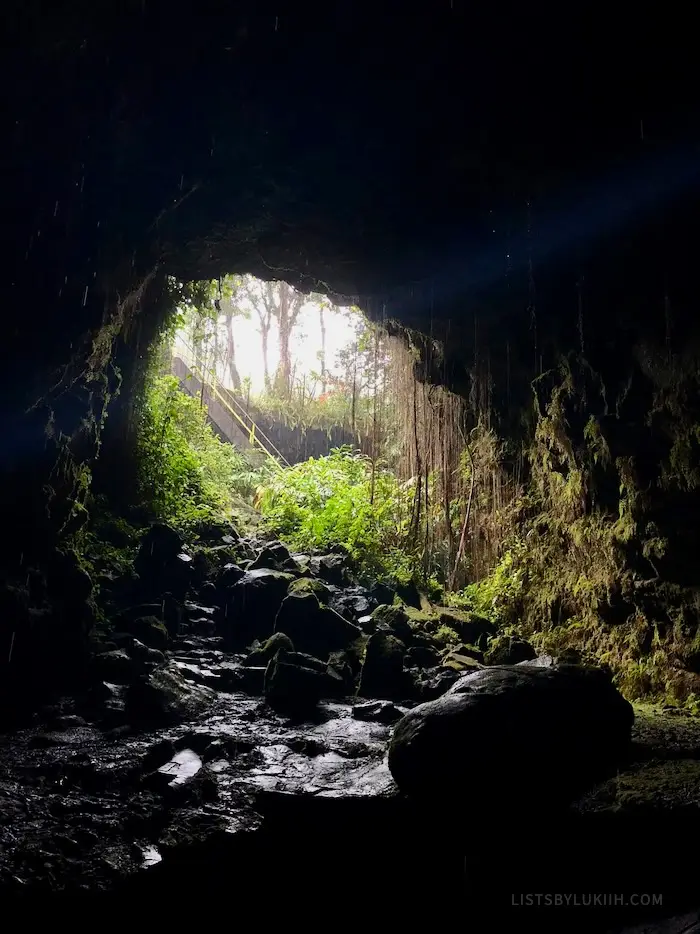
- If you go to the Hilo Farmer’s Market early and have extra time, you can skip Rainbow Falls and go to Kaumana Caves instead to hike through a lava tube. Make sure to bring nonslip shoes and flashlights.
If you’re on the Hilo side of the island, you can also stop by Hawaii Tropical Bioreserve & Garden, one of the island’s highly-rated botanical gardens.
🚗 Getting There: Hilo is on the east side of Hawaii. It takes 90 minutes to two hours to reach it from the other side of the island.
🍀 Lukiih’s Take: Hilo is a great place to visit if you have extra time in Hawaii. With just four days on the Big Island, Hilo is primarily a stopping point to reach other bigger attractions around it.
9. Visit Akaka Falls State Park
🤔 Why: Akaka Falls State Park is a short hike that takes you through a lush tropical rainforest with several waterfalls. The biggest waterfall, ‘Akaka Falls, is near the end.
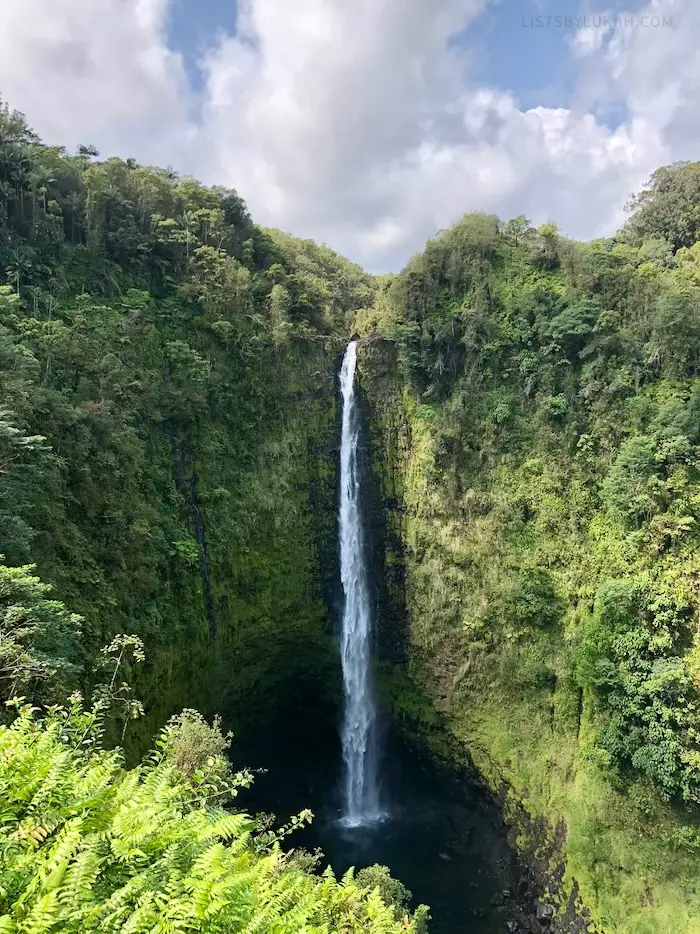
🚗 Getting There: Akaka Falls State Park is a 30-minute drive north of Rainbow Falls.
💰 Admission Fee: $5 per person
⏰ Suggested Duration: 1 to 2 hours
🍀 Lukiih’s Take: Akaka Falls State Park’s lush scenery is a nice contrast to the volcanic landscape in Hawaii Volcanoes National Park, and the waterfall is rewarding for such a short hike.
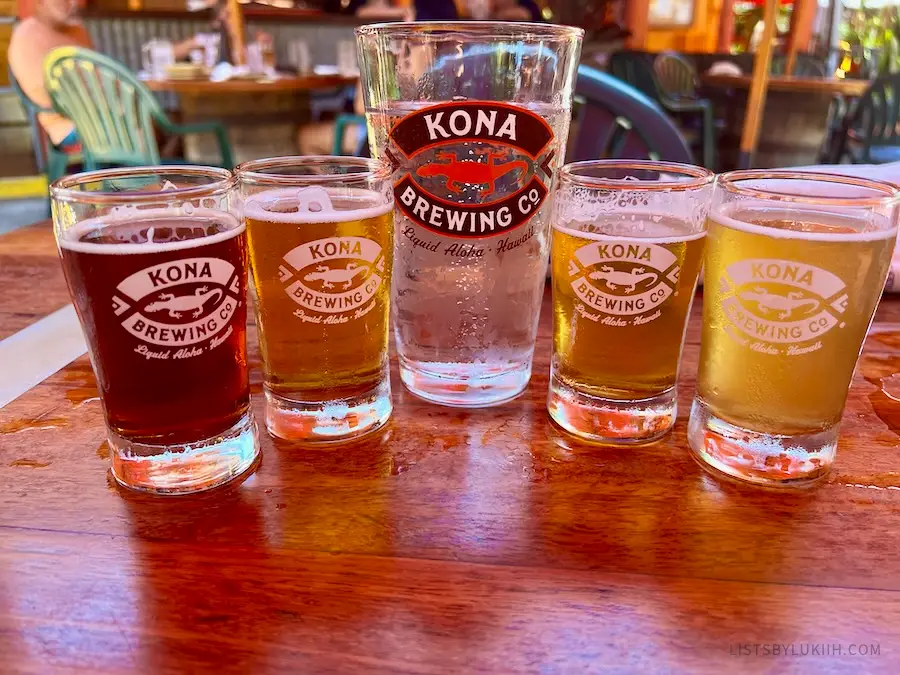
10. Drink Local Beer and Eat Hawaiian Poke
🤔 Why: Hawaii has a strong agriculture industry and many farms, so a lot of the local cuisine is fresh and delicious. You’ll find many delicious local places on the Big Island, but here are some that I enjoyed:
- Kona Brewery – one of the few that brews local beer on the Big Island. Expect to pay about $6 for a pint of beer at Kona Brewery Company.
- Foodland – Hawaiian supermarket that serves amazing, fresh poke at a reasonable price. You’ll find two locations on the Big Island.

- 808 Grindz Cafe – Hawaiian restaurant that serves incredible ube pancakes and loco moco, a Hawaiian dish. If you get the pancakes, make sure to get them with the homemade, divine “mac-nilla” sauce.
Where To Stay on the Big Island
Here’s what to consider when choosing where to stay on the Big Island.
- Side of the island – Generally, most visitors stay on either the west side in Kailua-Kona or on the east side in Hilo. Kona offers more things to do and allows you to easily access the south and north sides. Hilo is mainly close to the Hawaii Volcanoes National Park and Mauna Kea.
- Trip itinerary – If you want to follow this itinerary and minimize transportation time, stay on the Kona side, except for the last day when you should stay on the Hilo side.
- Housing price – In general, the Hilo side of the Big Island has more affordable accommodations since it’s smaller and has fewer visitors.
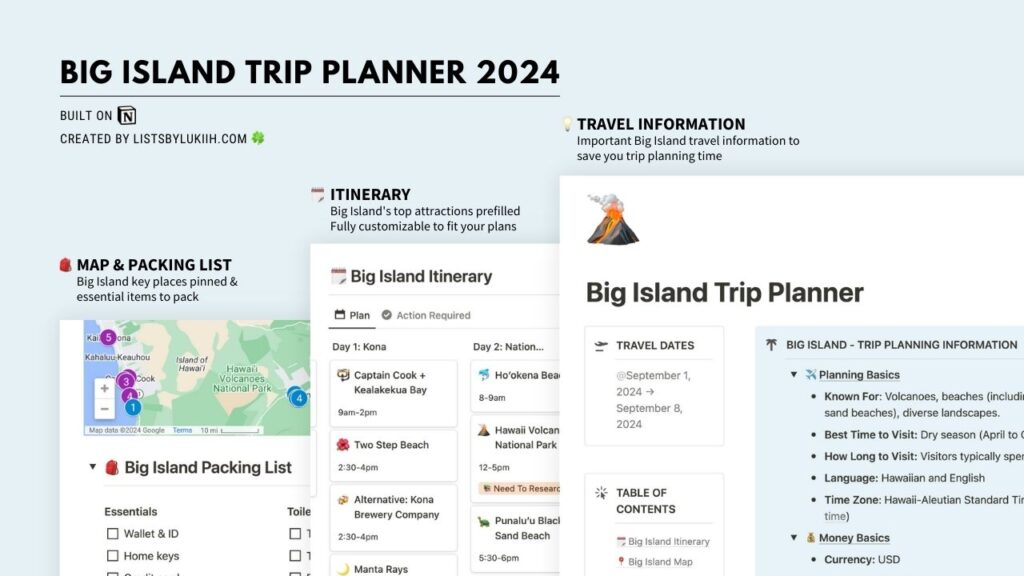
Big Island Trip Planner
To make your travel planning easier, download the trip planner below and use it as a starting point. The planner has country-specific travel information, an itinerary, a packing list, and a map with key places pinned.
The trip planner is built on Notion, which I use for all my travel planning (I genuinely love this tool). If you don’t have Notion, creating an account is free.
Hawaii Travel Guides
- 🏝️ Maui Amazing 5-Day Itinerary + Great Things To Do
- 🌋 Big Island: 3-4 Day Itinerary + 10 Great Things To Do
- 💰 My 2024 Hawaii Trip Cost: A Budget Breakdown
- ☀️ Haleakalā Sunrise: My Honest Review & Tips
- 🤿 Captain Cook Hike to Kealakekua Bay: My Honest Review & Tips
- 🚗 Road to Hana: My Honest Review & Tips
🧋 Support Lukiih
Lists by Lukiih is a humble website that I fund with my own savings. If you find my tips helpful, I appreciate you saying thanks with a bubble tea!